Calibration tool
|
Administrator
|
This post was updated on .
Hi,
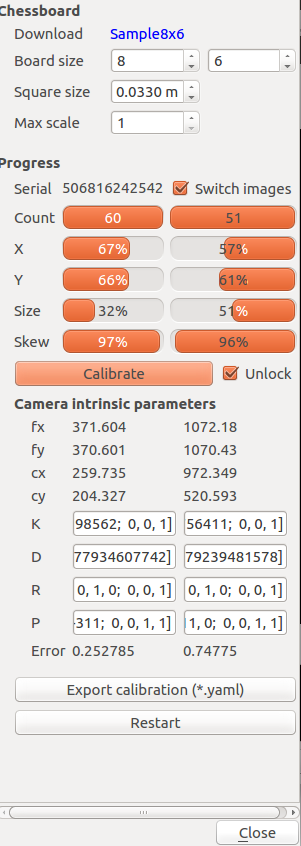
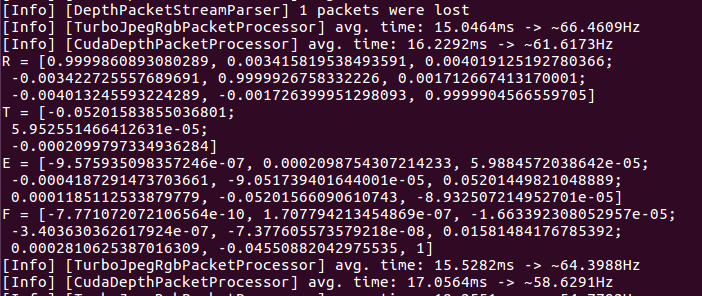
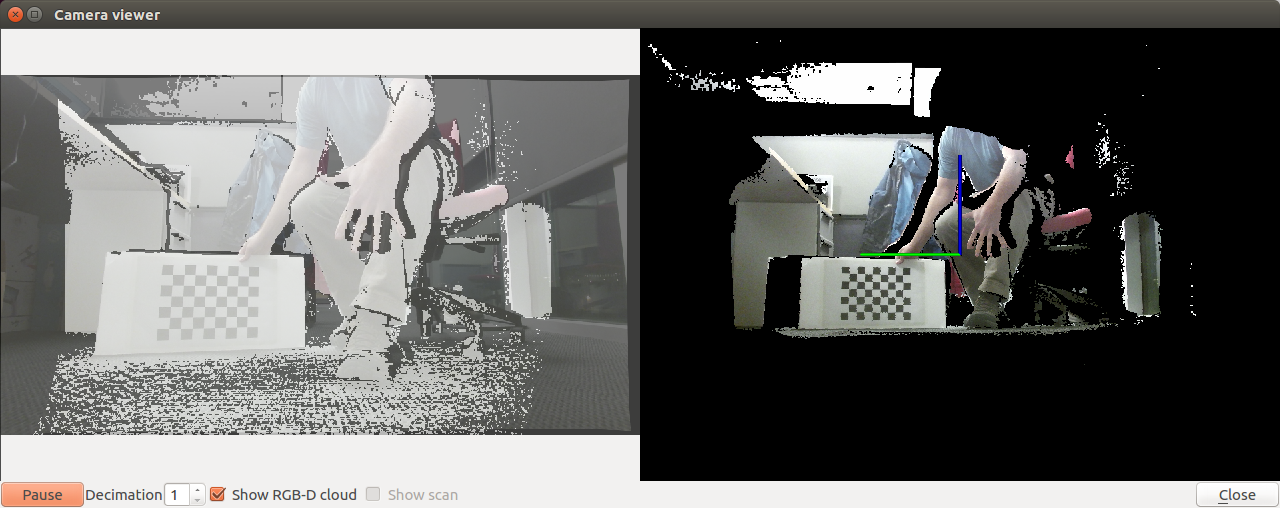
The Segmentation Fault seems similar to this post, when Qt tries to create a native dialog. Not sure why, but on some systems Qt exits with a Seg fault. EDIT That line could be replaced with: filePath = savingDirectory_+"/"+cameraName+".yaml"; But yes, with the values in the boxes, we can recreate the calibration files (make sure to update the code as I just fixed a small problem with the default calibration config to get rgb image on right for Freenect2 driver... to make sure that "Switch images" checkbox is checked):  I had difficulty to increase the size parameter of the IR camera, so I clicked "unlock" to enable calibration button. As shown in the screenshot at the end of this post, the registration still seem good. Just for the #####_pose.yaml file you need to check the values in terminal:  You need to create these yaml files in "~/Documents/RTAB-Map/camera_info" directory (K is the camera_matrix and the filename number is the serial shown in the calibration dialog): 506816242542_rgb.yaml
%YAML:1.0
camera_name: "506816242542_rgb"
image_width: 1920
image_height: 1080
camera_matrix:
   rows: 3
   cols: 3
   data: [ 1.0721798374195264e+03, 0., 9.7234873307388148e+02, 0.,
       1.0704297787811438e+03, 5.2059326075641104e+02, 0., 0., 1. ]
distortion_coefficients:
   rows: 1
   cols: 5
   data: [ 6.3890971334225555e-02, -1.1705844216234957e-02,
       -5.2067146440882184e-04, 6.8801290500431602e-03,
       -4.1082792394815777e-02 ]
distortion_model: plumb_bob
rectification_matrix:
   rows: 3
   cols: 3
   data: [ 1., 0., 0., 0., 1., 0., 0., 0., 1. ]
projection_matrix:
   rows: 3
   cols: 4
   data: [ 1.0721798374195264e+03, 0., 9.7234873307388148e+02, 0., 0.,
       1.0704297787811438e+03, 5.2059326075641104e+02, 0., 0., 0., 1.,
       1. ]
506816242542_depth.yaml
%YAML:1.0
camera_name: "506816242542_depth"
image_width: 512
image_height: 424
camera_matrix:
   rows: 3
   cols: 3
   data: [ 3.7160389677760753e+02, 0., 2.5973476728652292e+02, 0.,
       3.7060055478796102e+02, 2.0432682541985619e+02, 0., 0., 1. ]
distortion_coefficients:
   rows: 1
   cols: 5
   data: [ 1.1081198009714874e-01, -2.6347387222937568e-01,
       -1.5926911199829262e-03, 7.9663544447176864e-03,
       9.8164779346077424e-02 ]
distortion_model: plumb_bob
rectification_matrix:
   rows: 3
   cols: 3
   data: [ 1., 0., 0., 0., 1., 0., 0., 0., 1. ]
projection_matrix:
   rows: 3
   cols: 4
   data: [ 3.7160389677760753e+02, 0., 2.5973476728652292e+02, 0., 0.,
       3.7060055478796102e+02, 2.0432682541985619e+02, 0., 0., 0., 1.,
       1. ]
506816242542_pose.yaml
%YAML:1.0
camera_name: "506816242542"
rotation_matrix:
   rows: 3
   cols: 3
   data: [ 9.9998608930802890e-01, 3.4158195384935909e-03,
       4.0191251927803656e-03, -3.4227255576896906e-03,
       9.9999267583322260e-01, 1.7126674131700012e-03,
       -4.0132455932242886e-03, -1.7263999512980930e-03,
       9.9999045665597053e-01 ]
translation_matrix:
   rows: 3
   cols: 1
   data: [ -5.2015838550368010e-02, 5.9525514664126309e-05,
       -2.0997973349362839e-04 ]
essential_matrix:
   rows: 3
   cols: 3
   data: [ -9.5759350983572464e-07, 2.0987543072142328e-04,
       5.9884572038641998e-05, -4.1872914737036608e-04,
       -9.0517394016440014e-05, 5.2014498210488889e-02,
       1.1851125338797785e-04, -5.2015660906107430e-02,
       -8.9325072149527011e-05 ]
fundamental_matrix:
   rows: 3
   cols: 3
   data: [ -7.7710720721065640e-10, 1.7077942134548691e-07,
       -1.6633923080529570e-05, -3.4036303626179238e-07,
       -7.3776055735792176e-08, 1.5814841767853919e-02,
       2.8106253870163094e-04, -4.5508820429755348e-02, 1. ]
You can click on "Test" button in Preferences->Source to see if the calibration/registration is okay:  cheeers, Mathieu |
|
Thanks Mathieu, i will give it a try.
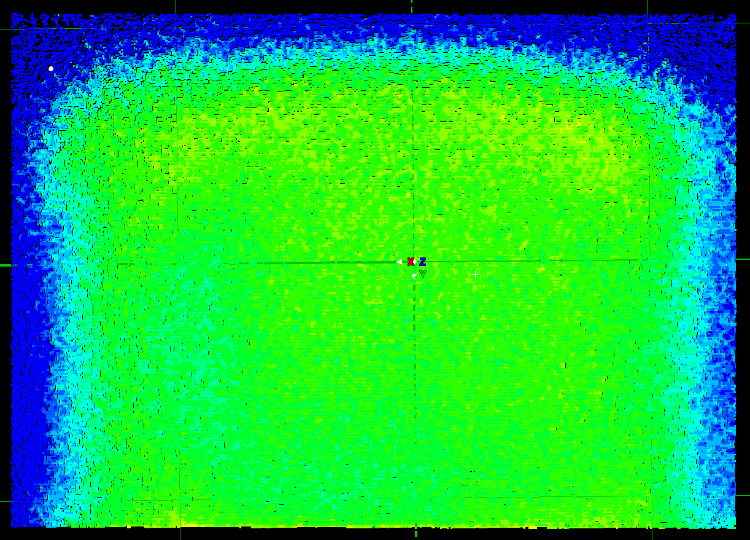
Any pointers on the error value to aim at? I have tested the accuracy of the default calibration and the cloud bows out quite a bit along the edges (blue areas in the image bellow depict a deviation of over 40mm from a plane that was fitted onto the cloud)  ) )
Is it possible to crop the images using ros, ignoring the areas where the quality is poorer? |
|
My deviations above refer to the depth calibration obviously and are sourced from the a single cloud captured in ros.
|
|
Administrator
|
In reply to this post by consoante
Hi,
Calibration error between 0.1 and 1 should be okay (under a pixel of error). Note that this calibration doesn't fix the depth distortion. Depth distortion calibration can be done following this tutorial. To crop the borders, you can use ROI (Region Of Interest) parameters: $ rosrun rtabmap_ros rtabmap --params | grep Roi Param: Grid/DepthRoiRatios = "0.0 0.0 0.0 0.0" [[Grid/FromDepth=true] Region of interest ratios [left, right, top, bottom].] Param: Kp/RoiRatios = "0.0 0.0 0.0 0.0" [Region of interest ratios [left, right, top, bottom].] Param: Vis/RoiRatios = "0.0 0.0 0.0 0.0" [Region of interest ratios [left, right, top, bottom].]Values are 0 and 1. For example: "0.1 0.1 0.1 0.0" will filter 10 % left, top, right of the image. "Grid/" is used for the occupancy grid map. "Kp/" is used for the vocabulary. "Vis/" is used for odometry and loop closure transformation. The ROI parameter is also here for 3D rendering in rtabmapviz (Preferences->3D Rendering). cheers, Mathieu |
|
Mathieu
I ran the stand alone tool with --stereo (this is required to load both the RGB and IR cameras), errors are well bellow 1 px but then i see that stereo calibration results in a RMS error of 20.807992. Would this result be normal? Thanks so much again for your time |
|
Administrator
|
Hi,
I tried the console version with "--stereo" and a kinect v2, here is the reported stereo error: [ INFO] stereo calibration... done with RMS error=0.834372 Maybe try again to see if you can reduce this error. Tip: you can increase the "scale" parameter to 2 in the calibration dialog to help detecting the checkboard when it is far from the depth camera. I noticed that the output files are "left" and "right". They should be renamed to "depth" and "rgb" respectively. cheers, Mathieu |
|
I will try again. Can you let me know what pattern you are using and what size (A4, A3, etc) ? do you have the pattern on a tripod?
Do you calibrate at different ranges, for example 1m, 2m or 3m? Also, what calibration model is being used behind the scenes? I can't thank you enough i think, but let me say it again THANKS! |
|
Administrator
|
Hi,
I use the linked pattern of the calibration tool. You may have to adjust the square size depending on which paper size you have chosen. Yes, it is important to show samples at different ranges. I generally move the checkboard or the camera. Here is an example where I move the checkboard (from this tutorial). See cv::calibrateCamera() for the approach used for calibration. cheers, Mathieu |
«
Return to Official RTAB-Map Forum
|
1 view|%1 views
| Free forum by Nabble | Edit this page |


