Test on KITTI dataset
|
Hello,Matlabbe:
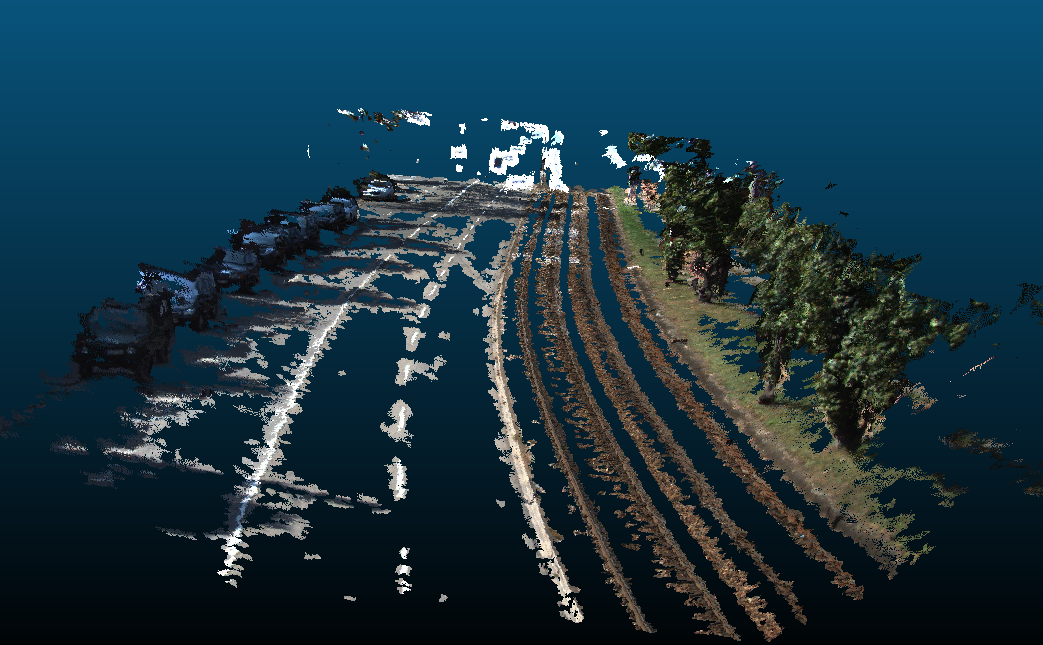
I tested the rtabmap on kitti datasets with different sequences. I find that the results are not good. To be specific, the dense cloudpoints map has many empty areas, especially road surface. The following picture is the result of sequence 2011_09_26_drive_0001_sync. Note that there is almost no road surface but just some lane lines. I wonder why the results for kitti are not good? Maybe the influence of illumination? or other reasons? Is there any methods to improve it? Thanks a lot! 
|
|
Administrator
|
Hi,
The disparity image is generated by cv::StereoBM by default. Normally when there is not a lot of texture, the algorithm won't compute any disparity. cv::StereoSGBM can be also used, but at a higher cost. Look at the corresponding parameters: $ rtabmap --params | grep Stereo Param: Stereo/DenseStrategy = "0" [0=cv::StereoBM, 1=cv::StereoSGBM] Param: Stereo/Eps = "0.01" [[Stereo/OpticalFlow=true] Epsilon stop criterion.] Param: Stereo/Iterations = "30" [Maximum iterations.] Param: Stereo/MaxDisparity = "128.0" [Maximum disparity.] Param: Stereo/MaxLevel = "5" [Maximum pyramid level.] Param: Stereo/MinDisparity = "0.5" [Minimum disparity.] Param: Stereo/OpticalFlow = "true" [Use optical flow to find stereo correspondences, otherwise a simple block matching approach is used.] Param: Stereo/SSD = "true" [[Stereo/OpticalFlow=false] Use Sum of Squared Differences (SSD) window, otherwise Sum of Absolute Differences (SAD) window is used.] Param: Stereo/WinHeight = "3" [Window height.] Param: Stereo/WinWidth = "15" [Window width.] Param: StereoBM/BlockSize = "15" [See cv::StereoBM] Param: StereoBM/Disp12MaxDiff = "-1" [See cv::StereoBM] Param: StereoBM/MinDisparity = "0" [See cv::StereoBM] Param: StereoBM/NumDisparities = "128" [See cv::StereoBM] Param: StereoBM/PreFilterCap = "31" [See cv::StereoBM] Param: StereoBM/PreFilterSize = "9" [See cv::StereoBM] Param: StereoBM/SpeckleRange = "4" [See cv::StereoBM] Param: StereoBM/SpeckleWindowSize = "100" [See cv::StereoBM] Param: StereoBM/TextureThreshold = "10" [See cv::StereoBM] Param: StereoBM/UniquenessRatio = "15" [See cv::StereoBM] Param: StereoSGBM/BlockSize = "15" [See cv::StereoSGBM] Param: StereoSGBM/Disp12MaxDiff = "1" [See cv::StereoSGBM] Param: StereoSGBM/MinDisparity = "0" [See cv::StereoSGBM] Param: StereoSGBM/Mode = "0" [See cv::StereoSGBM] Param: StereoSGBM/NumDisparities = "128" [See cv::StereoSGBM] Param: StereoSGBM/P1 = "2" [See cv::StereoSGBM] Param: StereoSGBM/P2 = "5" [See cv::StereoSGBM] Param: StereoSGBM/PreFilterCap = "31" [See cv::StereoSGBM] Param: StereoSGBM/SpeckleRange = "4" [See cv::StereoSGBM] Param: StereoSGBM/SpeckleWindowSize = "100" [See cv::StereoSGBM] Param: StereoSGBM/UniquenessRatio = "20" [See cv::StereoSGBM] Another way is to decimate the image to get more dense point cloud but at the cost of losing accuracy, with Mem/ImagePostDecimation parameter (set to 2 for example). Integrating other dense disparity computation algorithms is also possible, see StereoDense class (currently there are only 2 types). cheers, Mathieu |
«
Return to Official RTAB-Map Forum
|
1 view|%1 views
| Free forum by Nabble | Edit this page |

